Setup development environment on Mac with M1 processor
- Patrick Tang
The following instructions help to set up the development environment for STEP on a Mac.
Fork the following repositories
- https://github.com/tyndale/step (master)
- https://github.com/tyndale/jsword (jsword-tyndale-master)
Installation
(You probably want to create a project folder. The following assumes this is /dev)
Your Mac need the brew command. If it is not installed, review the instruction on this page.
Install Java
Install Java JDK (Java 8 is required, but there may be problems with 9 and upwards)
For Mac with M1 processor, I followed instruction similar to this page. I have the "Zulu 8.66.0.15-CA-macos-aarch64" installed on my Mac.
Configure paths and environment variables
- This is in my .zshrc file:
export JAVA_HOME=/Library/Java/JavaVirtualMachines/zulu-8.jdk/Contents/Home/jre
Install Maven
brew install maven
Install Git
Install git If it is not already installed
Install Tomcat
Install Apache Tomcat. On Mac, if you use homebrew run: brew install tomcat@9
If you are using Tomcat 9, you will need to edit the server.xml file for the tomcat installation. On my system the file is located at /opt/homebrew/etc/tomcat@9/server.xml
Find the <Connector> which is not commented out and add: relaxedQueryChars="[|]"
It should look something like this:
<Connector port="8080" protocol="HTTP/1.1"
           connectionTimeout="20000"
           redirectPort="8443"
           relaxedQueryChars="[|]" />
On my system, tomcat repeatedly has a warning message regarding caching. I added the following line to /opt/homebrew/etc/tomcat@9/logging.properties.
Install stand-alone version of STEP
Install the download version of STEP from http://www.stepbible.org/downloads.jsp. Installing the stand-alone version of STEP will install a few Bible modules (ESV, SBLG, OHB, ...) which is required to run STEP. If you do not install the stand-alone version of STEP, you will not have any Bible modules and the development environment will not start.
Clone your fork of the source code
For example:
Fork JSword into your Github account (from tyndale/jsword - unless already done above)
Clone JSword on your computer
cd /dev (use the appropriate directory on your system)
git clone https://github.com/stepbible/jsword.git
We are not using the master branch for JSword. So you will need to switch branch once it is cloned:
cd jsword
git checkout jsword-stepbible-2022
- Clone STEP
cd /dev (use the appropriate directory on your system)
git clone https://github.com/stepbible/step.git
Build the code
Run the following commands from a git command prompt:
- from the JSword source code directory. Make sure to build this first.
cd /dev/jsword (use the appropriate directory on your system)
mvn clean install -DskipTests=true
- from the Step source code directory
cd /dev/step
mvn clean install -DskipTests=true
Install Intellij
- Download the Intellij Community Edition from here: http://www.jetbrains.com/idea/download/. The Community Edition is free and seems to have all the Java development functions. The Community Edition cannot debug jsp files but we rarely change our jsp files.
- Import JSword as a Maven project
- File>New>"Project from Existing sources":
- Find, select and open the jsword folder (eg /dev/jsword)
- Select "Import project from external model", select "Maven", click "Create" button
- Select (check) the "Import Maven projects automatically" option. (Not sure if this shows up on the Mac. This showed on Windows in a previous version of IntelliJ)
- accept defaults for Import Project
- Import the STEP software as a Maven project
- File>New>Module from Existing Sources:
- Find, select and open the step folder (eg /dev/step)
- Select "Import project from external model", select "Maven", click "Create" button
- Select (check) the "Import Maven projects automatically" option
- for SDK, click on "+" then select JDK and find the Java/jdk folder
- accept defaults for Import Project
- Configure the IntelliJ's SDK to Java 1.8
- In IntelliJ, clicked on File -> Project Structure -> Platform Settings -> SDKs
- Select Java 1.8
- Install Plugins Smart Tomcat
- Click on "IntelliJ IDEA" at the upper right menu bar
- Click on Settings
- Select Plugins
- Search for Smart Tomcat and install it.
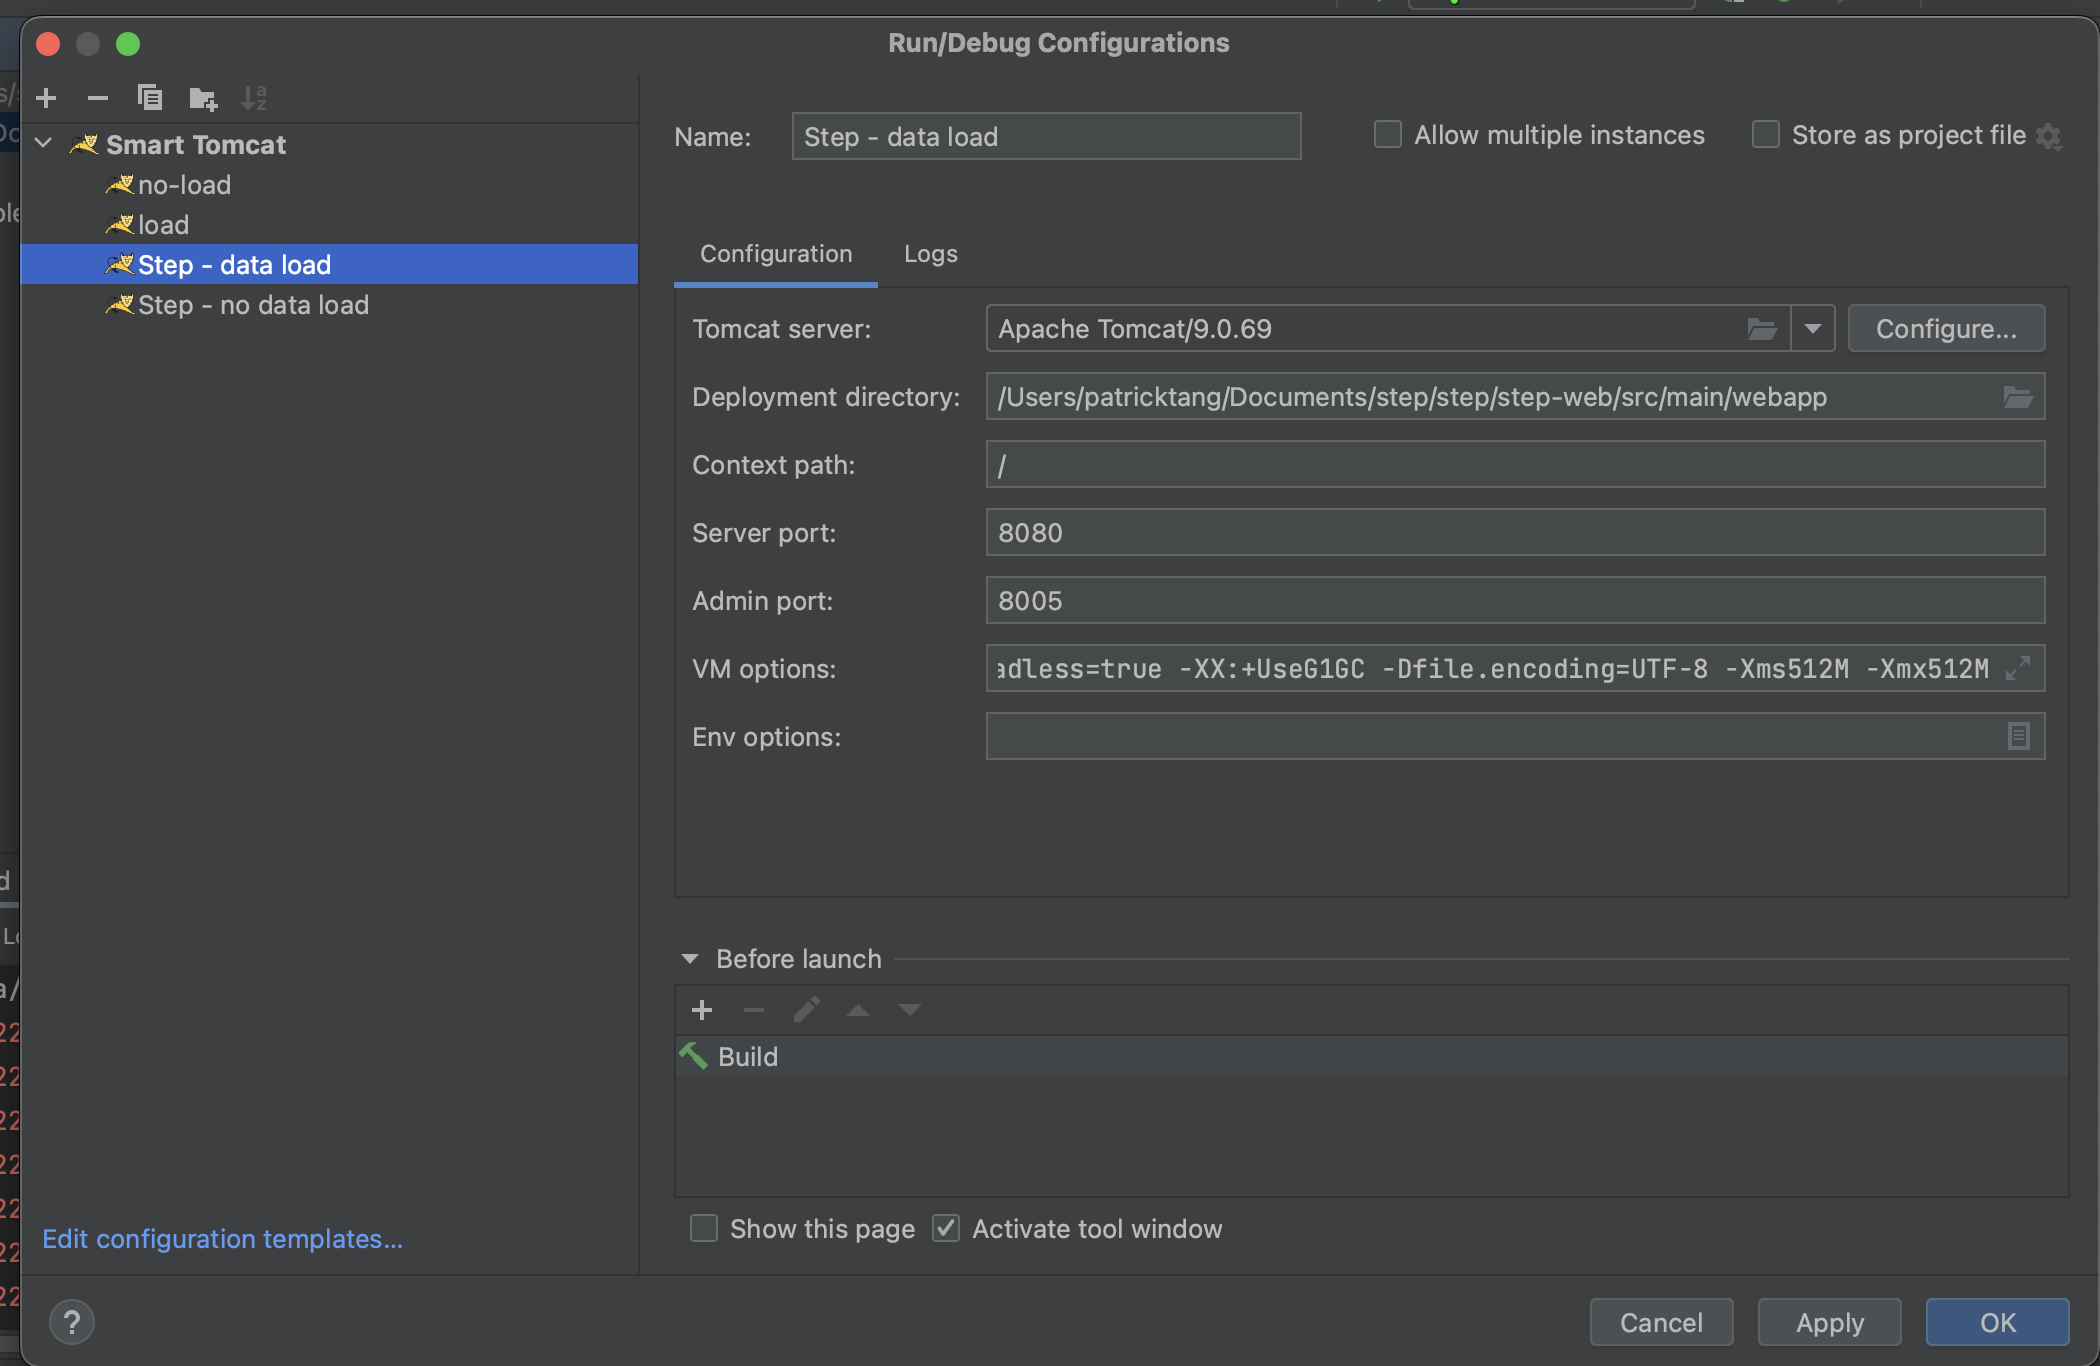
- Create a Run/Debug configuration
- menu Run > Run… > Edit configurations > "+" (top left on the screen) > Smart Tomcat >Local
- setup with:
- Name= Step - data load
- Tomcat server:
- click on "Configure..." button
- Select "Tomcat Server" on the left hand pane
- Click on "+" under Tomcat Server
- Open the tomcat folder. On my system it is /opt/homebrew/Cellar/tomcat@9/9.0.70/libexec
- Back to the "Run/Debug" Configuration" window
- Tomcat server: It should the Tomcat server selected
- Deployment directory: /dev/step/step-web/src/main/webapp
- Context path: /
- Server port: 8080
- Admin port: 8005
- VM options:
- -XX:ReservedCodeCacheSize=64m -Dstep.loader=true -Dstep.skipBookInstallation=true -Dstep.setup.password=P@ss0rd2o14T0pl@dyLuthe3 -Djava.awt.headless=true -XX:+UseG1GC -Dfile.encoding=UTF-8 -Xms512M -Xmx512M
- Test the setup:
- menu Run 'Step (with data load)''
(this should eventually start up the browser and run STEP) - Open a new browser page on http://localhost:8080/?debug
- menu Run 'Step (with data load)''
- Create a Run/Debug configuration without loading
(this will restart Step without creating/refreshing all your search indexes).- menu Run > Run… > Edit configurations >
- select "Step - data load" in the left column and click on the Copy symbol above it
- Changes:
- Name= Step - no data load
- VM options=
- -XX:ReservedCodeCacheSize=64m -Dstep.development=true -Dstep.skipBookInstallation=true -Dstep.setup.password=P@ss0rd2o14T0pl@dyLuthe3 -Djava.awt.headless=true -XX:+UseG1GC -Dfile.encoding=UTF-8 -Xms512M -Xmx512M